INTRO
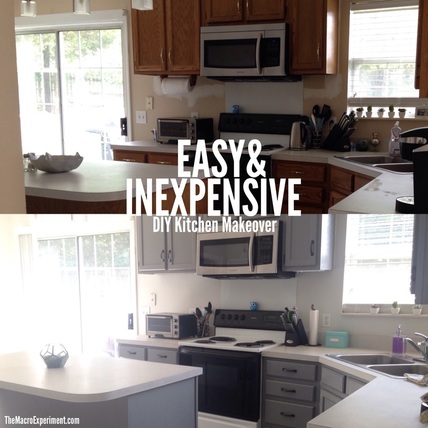
I realize this post is not DIRECTLY related to macros or lifting, but I do know that us flexible dieters spend a LOT of time in the kitchen. And if you are anything like me and you HATE your kitchen, it will bother you until you finally do something about it. So after wanting to do it for a few years, I finally just went for it... and to my surprise it was QUICK, EASY, AND CHEAP!! Like for real. It took me 2 days and about $200-300 mainly for paint/hardware. I want to post this makeover How-To guide so you can do it even quicker/more efficiently than I did by having an actual game plan. I have NEVER done anything like this before and suck at handy-man kind of stuff, so I want you to know that if I can do it, you can too! Special thanks to my dear friend Maye, who gave me the cajones to do it and encouraged me throughout the process.
REQUIREMENTS
TIME REQUIRED: 2-3 days
MONEY REQUIRED: $200-370 ($370 includes sick chandelier & moss terrarium)
 | SUPPLIES REQUIRED: Hardware - Lowes - $120 Spray Paint for Hinges - Lowes - $7 120 Grit Sandpaper - Lowes - $4 Paint Rollers & Liners/Trays - Home Depot - $15 Drop Cloths (x2) - Home Depot - $6 Paint Thinner - PPG Paint - $8 Cabinet Paint - PPG Paint - $40 Wall Paint - Home Depot - $20 (w/ $10 rebate Behr brand) (Optional) Moss & Terrarium - World Market - $27 Chandelier - Southeastern Salvage or ebay - $119 |
Other supplies you will need but probably already have:
Drill and/or screwdriver, blue tape/frog tape before painting walls, step stool/ladder, old cloths, paper towels, paint brush.
Keep in mind, these are the supplies I used and the costs associated with what I found. The hardware I chose was the most expensive they had at Home Depot, but I thought it was worth it for the restoration hardware look I was going for. Also, I needed 25 pieces because we have a LOT of cabinets. And a few more details about the paint, in case you were want a similar look -- the cabinet paint is called Dover Gray by PPG (oil-based) and I asked for it to be lightened by 25%. The wall color is called Silver Drop by Behr from Home Deopt. I used the same gallon to paint the adjoining bathroom.
If you know me at all, you know I'm a very thorough person but I don't like to sift through B.S. I like efficiency, I like things written in layman's terms, and I like things short and concise. So I'll get straight to the point with this post. Here are the EXACT steps I recommend taking to achieve this or a similar look for your own kitchen!
STEPS TO PAINTING CABINETS
(I'm assuming you know how to paint walls, which you should do FIRST)
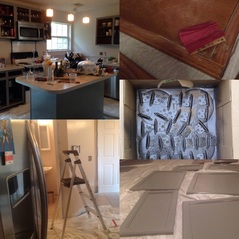
1. Take out a drawer or cabinet door and bring it to a legit paint store such as PPG (not lowes or home depot). Ask a person who seems nice and knows what they are talking about to recommend EXACTLY how to paint your type of wood. Different types of woods/laminates/etc. can need completely different types of painting processes. Luckily, I just needed to lightly sand mine and do two coats of oil-based paint without primer. Your dude will tell you what's up. Also ask for roller recommendations for whatever type of paint you go with.
2. Label the inside of every cabinet door with masking tape and some kind of numbering system so you know what door goes where. This is a VERY important step. For instance, All of my top cabinet doors I labeled 1A, 2A, 3A, etc. Snap a few pictures of the cabinet doors/drawers open too with the labels, just in case. Also take everything off the countertops and out of the cabinets (or push it to the very back so it doesn't get covered in sand paper wood dust). Do all of the obvious things like put the drop cloth down etc. etc.
3. Take off all cabinet doors with drill. Remove all hinges with drill. Remove all hardware with drill. Keep all hinges and hardware organized in plastic bags. Remove drawers.
4. Sand cabinets, doors, and drawers. I only did a light sanding as recommended by my paint guy. Then I put paint thinner on a rag and wiped all the gunk and sanding dust off. Warning: it smells crazy.
5. Tape edges and paint cabinets. Listen to some good music as you do so and sing along. Have fun with it! If wet paint gets somewhere it shouldn't, use paint thinner on a cloth to remove paint. Use paintbrush to paint edges and roller to fill in bigger areas. Go up and down, no diagonals for cabinets; you're aiming for a completely seamless look. I painted all of my cabinet doors and drawers in my garage on a drop cloth. Let dry (mine took 24 hours). Paint another coat if necessary.
6. After first coat dries, bring a small cabinet door and/or one of your own pieces of hardware into place you are buying new hardware (or you may choose to paint your own hardware if you wish, a cheaper option). See what different kinds of handles look like on your door, but make sure it will align the holes PERFECTLY. That is key. Buy matching spray paint color for hinges to match.
7. Spray paint hinges. This may take two coats.
8. When paint has dried completely, drill new hardware and spraypainted hinges back onto cabinet doors and drawers. Then drill doors into place. Put drawers back as well.
9. Take off tape and apply touch-up paint where necessary.
10. CONGRATS, YOUR KITCHEN NOW LOOKS AMAZEBALLS! See, that was NOT hard at all! :D
EXTRA NOTES
I highly recommend TJ Maxx, Marshalls, and Target for cute extra touches/decorations that aren't expensive but look amazing. You can YouTube how to install chandeliers if you want to. We hired an electrician to install inset lighting, under-the-cabinet lighting, and install the chandelier. :)
Feel free to contact me or leave a comment with any questions you may have!
Much love!
- C
(I'm assuming you know how to paint walls, which you should do FIRST)
1. Take out a drawer or cabinet door and bring it to a legit paint store such as PPG (not lowes or home depot). Ask a person who seems nice and knows what they are talking about to recommend EXACTLY how to paint your type of wood. Different types of woods/laminates/etc. can need completely different types of painting processes. Luckily, I just needed to lightly sand mine and do two coats of oil-based paint without primer. Your dude will tell you what's up. Also ask for roller recommendations for whatever type of paint you go with.
2. Label the inside of every cabinet door with masking tape and some kind of numbering system so you know what door goes where. This is a VERY important step. For instance, All of my top cabinet doors I labeled 1A, 2A, 3A, etc. Snap a few pictures of the cabinet doors/drawers open too with the labels, just in case. Also take everything off the countertops and out of the cabinets (or push it to the very back so it doesn't get covered in sand paper wood dust). Do all of the obvious things like put the drop cloth down etc. etc.
3. Take off all cabinet doors with drill. Remove all hinges with drill. Remove all hardware with drill. Keep all hinges and hardware organized in plastic bags. Remove drawers.
4. Sand cabinets, doors, and drawers. I only did a light sanding as recommended by my paint guy. Then I put paint thinner on a rag and wiped all the gunk and sanding dust off. Warning: it smells crazy.
5. Tape edges and paint cabinets. Listen to some good music as you do so and sing along. Have fun with it! If wet paint gets somewhere it shouldn't, use paint thinner on a cloth to remove paint. Use paintbrush to paint edges and roller to fill in bigger areas. Go up and down, no diagonals for cabinets; you're aiming for a completely seamless look. I painted all of my cabinet doors and drawers in my garage on a drop cloth. Let dry (mine took 24 hours). Paint another coat if necessary.
6. After first coat dries, bring a small cabinet door and/or one of your own pieces of hardware into place you are buying new hardware (or you may choose to paint your own hardware if you wish, a cheaper option). See what different kinds of handles look like on your door, but make sure it will align the holes PERFECTLY. That is key. Buy matching spray paint color for hinges to match.
7. Spray paint hinges. This may take two coats.
8. When paint has dried completely, drill new hardware and spraypainted hinges back onto cabinet doors and drawers. Then drill doors into place. Put drawers back as well.
9. Take off tape and apply touch-up paint where necessary.
10. CONGRATS, YOUR KITCHEN NOW LOOKS AMAZEBALLS! See, that was NOT hard at all! :D
EXTRA NOTES
I highly recommend TJ Maxx, Marshalls, and Target for cute extra touches/decorations that aren't expensive but look amazing. You can YouTube how to install chandeliers if you want to. We hired an electrician to install inset lighting, under-the-cabinet lighting, and install the chandelier. :)
Feel free to contact me or leave a comment with any questions you may have!
Much love!
- C
PS - Here's a slideshow of some more photos for your viewing pleasure. :P

 RSS Feed